


%20(1).png)
Pinterest AI Avatar Video Bot From Form v2
- Easy setup, zero coding, plug & play file
- Runs on autopilot using ChatGPT
- Fully customizable and adjustable
Bot setup guide
Includes a duplicatable bot template and an exact step-by-step setup guide to get the bot running.
Create an account by clicking here.
You can access the Bot by
click here
and follow the instructions provided in the tutorial below.
Pinterest AI Avatar Video Bot v2

This bot is epic…but that’s because it is awesome. For starters, it utilizes the most advanced video avatar platform around right now. However this requires some expense. This scenario requires a subscription to HeyGen (CLICK HERE).
For HeyGen API access you’ll have to get the Enterprise Plan. For HeyGen API access you’ll have to get the Enterprise Plan. Minimum commitment for enterprise is $8,000 per year (equals just under $670 per month).
Aside from HeyGen you’ll also need a Cloud Convert account to compress the video output (don’t worry, this one is free ⇒ CLICK HERE).
After signing up you’ll need to integrate your account with Make, as it has a native app. And…of course…an OpenAI account for access to GPT.
Now let’s dive into the flow.
First, you’ll want to click the clock icon and set how often this scenario runs. If you go with the lowest HeyGen tier, you get roughly 15 minutes of video per month.
The output is typically between 60 and 90 seconds, which is 2 to 3 credits. This means, you could safely run this scenario two to three times per week.
Next, the first module is the topic rotator.

The default is currently these awesome topics, but you’ll need to replace those with your own.
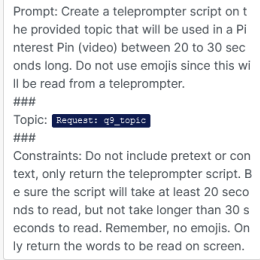
Then is the GPT “Script Writer” which writes the words for the “teleprompter”...this writes the text the video will speak.
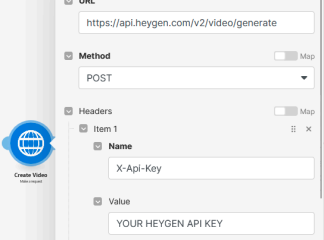
The next few modules make the HeyGen API call, wait a bit (10 minutes), then fetch the finished URL.
In the Create and Fetch API call modules, you’ll need to input your HeyGen API key…
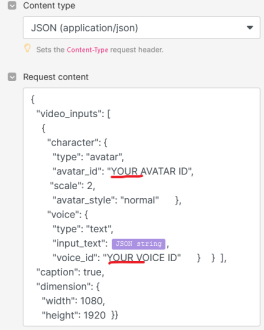
ALSO…you need to input your avatar id and voice id in the Create Video module…
Where do you get that information from? The two, extra, unconnected modules are API calls to list that information.
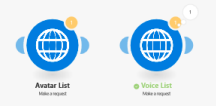
Simply connect them, then right click and run them each once. Then you’ll get the information you need in the return data (you must have created your avatar before doing this).
Also…regarding the avatar ID. It is NOT the first ID shown. You must go to avatars, and then avatar states, and the correct id will be there…
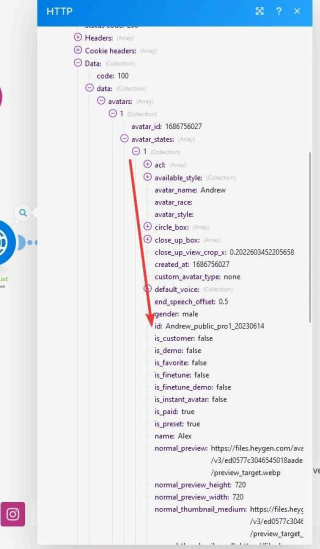
Voice ID does not have this problem…

After the HeyGen video url is retrieved, the next module is CloudConvert, which will compress the video.
Then the compressed video is uploaded to Make, because Pinterest will only accept the video in base64.
THEN we have the first Pinterest module, which is an API call. This module merely creates the bucket that the video will live in on Pinterest’s Amazon s3 server.
Once that bucket exists, another API call uploads the video into Pinterest’s s3 bucket.
Finally the scenario ends with the Pinterest module that actually posts the video to your Pinterest account.
You will need to provide a cover image URL and choose a board.
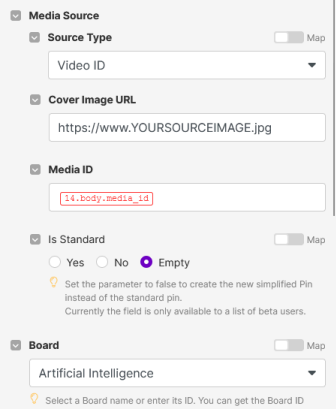
Then your video will be posted to Pinterest.
Pinterest AI Avatar Video Bot From Form v2

This scenario is identical to the previous one…with only one exception. It doesn’t have a topic rotator, but instead has a form input. The scenario also doesn’t run on a schedule since it has a
form trigger. Basically, you create a Jotform form, input context for the video into the form, and that will trigger the flow and the data will be passed to the A.I.
Here’s how you set that up. It requires a (free) Jotform account (CLICK HERE). Once you have a Jotform account, you can create a form (it’s really easy).
Just create a form with a short text input or long text (depending on how much details you want to give the A.I. vs how much you want it to create on its own)...

Once you have the form, then you need to connect it to your scenario.
You do this by clicking Add, and then Make will create a webhook. Simply name your webhook and then tell it which form you want it connected to and that’s it.
*PROTIP, you need to run the Jotform module first before any output can be used as a variable in other modules. So, disconnect Jotform from all other modules and then click run. Then fill out your form (go to the Publish page and just open it in a new window) and click Submit. This will trigger the module. Then when you reconnect it, you’ll see your answers as variables.
That’s it. Enjoy your realistic A.I. Avatar creating videos for you automatically.
Automate the bots effortlessly with our user-friendly platform and unlock the power of AI-driven efficiency in just a few simple steps!
To maximize the performance and engagement of this bot, it is crucial to tailor the ChatGPT prompts to your unique business context.
Don't miss out on the incredible opportunities that await - launch your bot now and experience the game-changing benefits of AI firsthand!
Integrate with your daily tools
Make it personal, make it yours
.png)